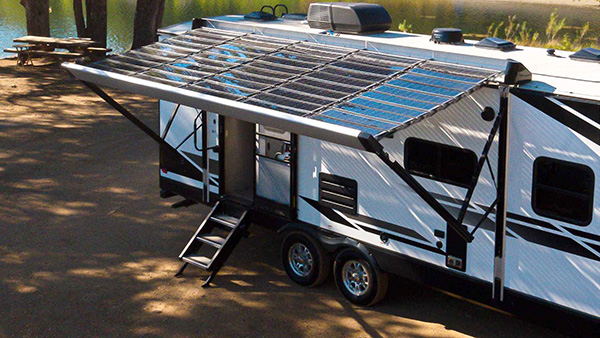
There's a reason you can make a solar panel awning for your RV. Solar awnings serve two purposes. First, it keeps your RV cool. Second, this allows the solar panels to collect sunlight even at lower angles, which happens in the fall and winter. Awnings are important whether the weather is hot or cold.

What Do You Need to Prepare?
- Flexible Solar Panel. There are two types of solar panels, rigid and flexible. For awnings, flexible or semi-flexible awnings should be used. They are lighter, thinner and easier to install. Power delivery is good, they have gasket openings for quick installation. A 60W solar panel is ideal for small RV windows. If you need more energy, you can install more panels. You can use a 12V or 18V system. For larger windows or power needs, a 100W solar panel will work. You can also connect two 60W portable solar panels.
- Charge Controller. You can choose MPPT or PWM charge controller. The rule of thumb is that the MPPT controller is better suited for high power needs because it is more efficient. MPPT controllers also have monitoring systems to track panel performance. The compact controller can handle up to 300W maximum output. Others will choose PWM controllers because they are more readily available and bundled with solar modules. It's up to you.
- Locking Suction Cup. You can use these to set the frame anywhere in your RV. Here we will place the suction cup on the window.
- Extension Cable. A 20-foot extension cable is ideal for RVs. But extension cords are available in different sizes, please choose the extension cord that meets your requirements. This also applies to the other materials here. Plan ahead where you will install the panels. That way, you won't suddenly stop work in the middle of construction.
- Charge Controller Monitor. Some charge controllers have a built in monitor. If not you can buy one. Some controller attachments have bluetooth functionality, allowing you to monitor your solar panels’ performance on an Android or iOS device.
Steps for Building Awning Frame:
- Drill an opening into one of the corner L fittings. Attach to a corner with screws. Repeat this with the other three L fittings.
- Cut the PVC into four parts. Use the L fitting you just attached for the measurement. Overlap each fitting by 75 inches.
- Set the PVC pieces into the corner fittings.
- Cut two more short PVC sections. Use these and the T fittings to create a leg hinge point. Repeat for the other leg.
- Cut two more PVC sections. Set each one into the T fittings.
- Use a PVC section to join the L fittings to the legs.
- Cut a couple more PVC sections to join the T fittings.
- Place the suction cup on the frame with the holder.
Do you Really Need a Solar Panel Awning?
You might wonder if an awning is really necessary. Maybe you already have solar panels installed, so does that really make a difference? If your RV already has solar panels installed, the awning can act as an extra power source. No amount of solar energy is too much. The excess power is stored in the battery and you can use it at night. This excess energy is very useful during cloudy days and winters. If your RV roof can't support a large solar array, setting up panels as window awnings is a great solution. A regular awning provides shade, but if it's solar, it can also harvest energy. Things you can do at home can also be done in the RV.
