A pure sine wave inverter will transform direct current (DC) into alternating current (AC) which can then be used to deliver high-quality electrical current to all sorts of home appliances. Inverter installation is a sensitive aspect of generating alternative energy sources (solar or electricity). These devices rely on electronics and are somewhat sensitive to external factors such as temperature, air pollution, and moisture. To install a pure sine wave inverter, follow the steps outlined below.
Steps of installing a pure sine wave inverter
- Planning work: The first step in installing a pure sine wave inverter is to plan the entire area. You must map the entire area, taking into account where the equipment and any auxiliary switches need to be mounted.
- Choosing a mounting location: Choose an area that is well-ventilated and free from direct sunlight, moisture, and flammable materials. Make sure the mounting surface is stable and can support the weight of the inverter. The inverter requires as much ventilation as possible and needs to be away from heavy objects. For pure sine wave inverter installations, the closer the better. To get the most out of your installation, make sure the path between the inverter and the battery system is as short as possible.
- Mounting and securing the inverter: Securely secure the inverter to the chosen surface using the appropriate mounting brackets. Make sure it is mounted in a stable location to prevent vibration and movement.
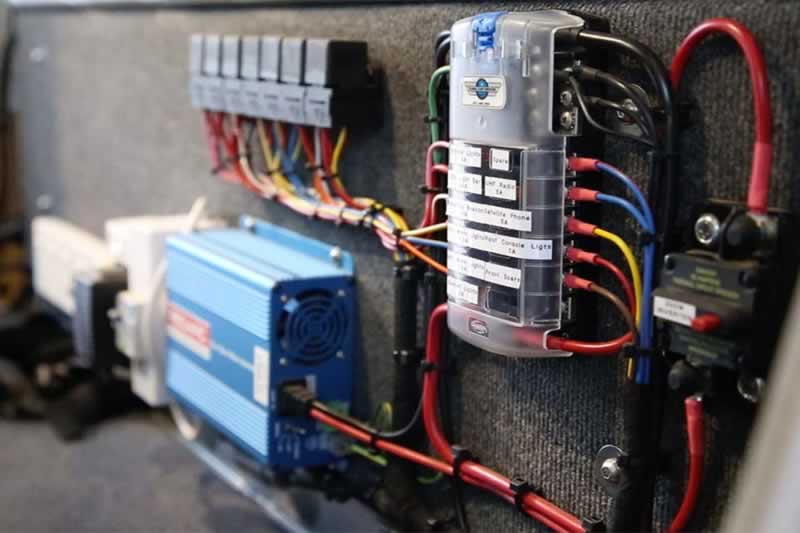
- Fuse holder installation: The battery wiring must be protected with an appropriately sized fuse located within 18 inches of the battery.
- Wiring: Use the correct gauge wires to connect the solar inverter to the battery bank. Make sure the polarity is correct (positive to positive, negative to negative). Install a fuse or circuit breaker between the inverter and the battery to prevent short circuits and overcurrent. Then properly ground the inverter to prevent electric shock. Connect the inverter to the ground following the grounding instructions in the manual. Connect the inverter's AC output terminals to the load (e.g., appliance, electrical system) using appropriate wiring and connectors, making sure the connections are secure. Professional installation of both ends of the inverter is very important because they carry a lot of current. If you are unsure about the process, hire a professional or go to a store that has the right crimping equipment. Pass the cables through the newly cut holes in the solar inverter, making sure the ends of the cables are protected with rubber boots. Look in the installation kit to find the rubber boots. Whether you are an electrician or a simple DIY enthusiast, you should know the importance of having wire cutters in your toolbox.
- Install the fuse box: The professional installation kit should install an inline fuse on the positive side of the DC cable. The kit should have a fuse and brackets that need to be installed in the battery box. If you need to purchase these accessories separately, make sure to choose those that can handle the pure sine wave inverter current load. When installing the vent bracket, leave enough space.
- Initial test: Turn on the inverter and check the display or indicators for any fault messages.
- Connect a small load: Connect a small load to the inverter to test its functionality. During the initial operation, monitor the inverter for any unusual sounds, odors, or performance issues.
- Final inspection and adjustment: Double-check all wiring connections to ensure they are secure. Check for any loose wires or connectors. Make sure the inverter vents are not blocked and that there is adequate airflow around the unit.
Precautions for installing pure sine wave inverter
- Thoroughly read the manufacturer’s manual and installation instructions to understand the specific requirements and recommendations for your inverter model.
- Check the inverter and all components for any signs of damage or defects before installation.
- Before starting the installation, disconnect the battery and any other power sources to prevent accidental shocks or short circuits.
- Make sure the inverter is close to the battery, but in a protected area free from battery fumes, moisture, and dirt.
- Connecting all necessary cables and wires to the appropriate locations on the inverter. Make sure to screw them in with strong corrosion-resistant screws.
- Finally, protect the inverter with a sturdy protective cover without affecting the ventilation system.