Micro inverters are becoming increasingly popular in solar energy systems due to their efficiency and flexibility. Photovoltaic micro inverter technology proposes to integrate the inverter directly with a single photovoltaic module, and equip each photovoltaic module with an inverter module with DC to AC conversion function and maximum power point tracking function, and convert the electric energy generated by the photovoltaic module directly into AC electric energy for use by AC load or transmission to the grid. When one of the panels does not work well, only this one will be affected. All other photovoltaic panels will operate in optimal working conditions, making the system more efficient overall and generating more power. If you're considering installing a solar micro inverter system for your solar panels, this comprehensive guide will walk you through the process.
Before Install:
Site Assessment and Planning
- Roof Inspection. Ensure your roof is in good condition and can support the weight of the solar panels and mounting hardware.
- Shade Analysis. Identify potential shading issues from nearby trees, buildings, or other obstructions.
- System Design. Determine the optimal placement of each panel and the best route for cabling to minimize losses and exposure to the elements.
Safety Precautions
- Turn Off Power. Ensure that the main electrical power to your home is turned off during installation to prevent electrical shock.
- Use Proper Gear. Always wear appropriate safety gear, especially when working at heights or handling electrical components.
- Follow Local Codes. Adhere to local building and electrical codes to ensure the safety and legality of your installation.
Solar micro inverter port diagram
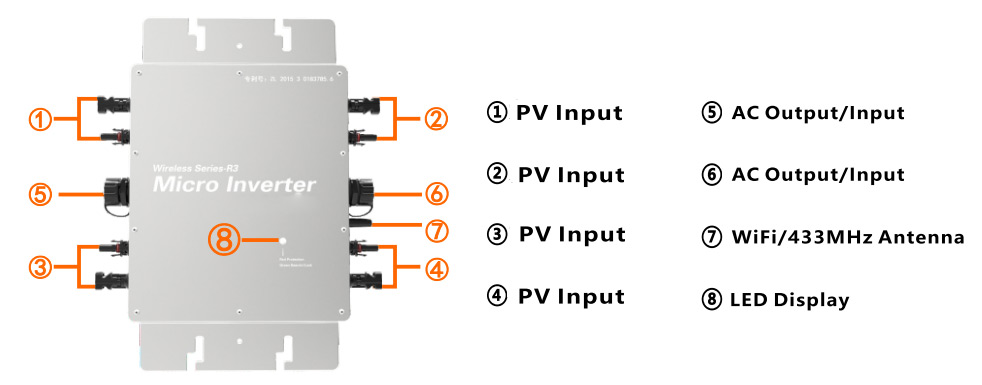
Inverter.com provides 300W-1400W solar micro inverters adopted with an IP67 waterproof streamline appearance design, which can effectively prevent rain erosion on the surface, and has built-in high-performance Maximum Power Point Tracking (MPPT) function, which can better track the changes of solar photometry and control different output power, effectively capture and collect sunlight. Reverse AC power transmission technology is one of our patented technologies. The power output from micro grid inverters can be used preferentially to provide load. The endless power is transmitted to the power grid in the opposite direction. The power output from inverters can be used efficiently, and the power transmission rate can reach more than 99%. To show you what you can expect, we've outlined a simple six-step guide for a typical solar microinverter installation process.
Installation in Progress:
Six-step to install a solar micro inverter
1. Fix the inverter on the support of the photovoltaic panel with the screw attached to the machine, as shown in the following figure:
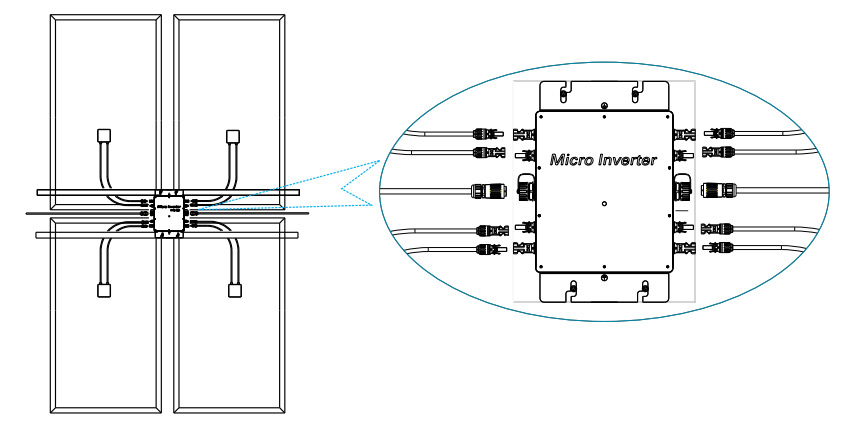
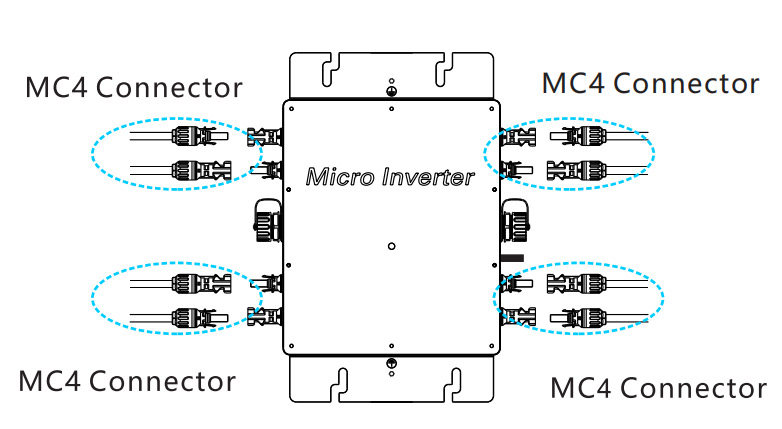
2. Connect the two DC terminal of the PV to the micro inverter, positive to positive, negative to negative. As shown below:
3. Open the waterproof cap on AC output side of the microinverter, then plug to AC power line. As shown below:
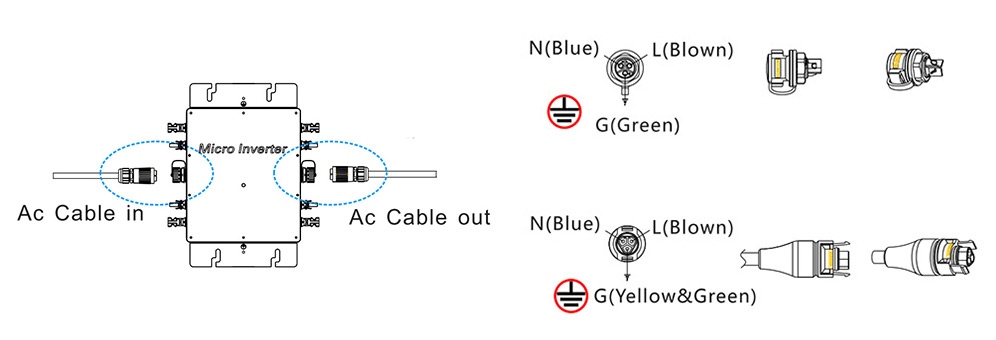
4. Plug the AC output line to main AC cable.
5. Repeat the first step to the third step to complete the installation of micro inverters.
6. Finally, please connect the AC main cable to the utility grid to run renewable energy and saving money.
After Install:
Final Checks and Maintenance
- Inspect Installation. Perform a thorough inspection of the entire installation to ensure all components are securely mounted and all connections are correct.
- Schedule Maintenance. Regular maintenance is essential for the longevity and efficiency of your solar power system. Schedule periodic inspections to clean the panels, check for shading issues, and ensure all electrical connections remain secure.
Installing solar cell micro inverters can significantly enhance the performance and reliability of your solar energy system. By following these detailed steps, you can ensure a safe and efficient installation. Remember to consult the manufacturer's instructions for specific details related to your equipment and always prioritize safety. If you have any questions, please feel free to contact us on inverter.com. With proper planning and execution, your pv micro inverter system will provide clean, renewable energy for years to come.