One of the most common mistakes people make when building an off-grid wind power system is selecting a charge controller by feel — picking something that looks "about right" for the turbine and hoping for the best. This approach leads to one of two problems: the controller's rated current is too low, triggering overload protection or burning out components during high-wind conditions; or the controller is wildly oversized, wasting money while actually degrading charging accuracy and shortening battery lifespan.
The correct approach is straightforward: run the numbers before you buy. This guide walks through the complete sizing calculation for a wind turbine charge controller — covering the core formula, system voltage selection, common sizing mistakes — with specific model recommendations from the wind turbine MPPT charge controller product line at Inverter.com.
The Sizing Logic: Start With the Turbine, Work Outward
Controller sizing starts not with the controller, but with your wind turbine's rated output parameters. Before you can determine what the controller needs to handle, you need to know what the turbine can produce. Three variables drive the entire calculation:
- Turbine rated power (W): The nominal output power shown on the turbine's nameplate — this is your baseline.
- System voltage (V): The nominal voltage of your battery bank — this converts watts into amps.
- Safety margin factor: Standard practice calls for a 1.25× factor (25% overhead) to absorb momentary power surges that occur when wind speed fluctuates above the rated value.
Together, these three inputs produce the fundamental sizing formula.
The Core Formula
Minimum controller rated current ≥ (Turbine rated power ÷ System voltage) × 1.25. The purpose of this formula is to ensure the controller can handle the turbine's full rated output without tripping overcurrent protection — and still have headroom for the peak currents that real-world variable wind conditions routinely generate.
Example A — 300W turbine / 12V system:
Rated current = 300W ÷ 12V = 25A
With safety margin: 25A × 1.25 = 31.25A
Requirement: controller rated at ≥ 32A → 300W Wind Turbine MPPT Charge Controller
Example B — 500W turbine / 24V system:
Rated current = 500W ÷ 24V = 20.8A
With safety margin: 20.8A × 1.25 = 26A
Requirement: controller rated at ≥ 27A → 500W Wind Turbine MPPT Charge Controller
Example C — 1000W turbine / 24V system:
Rated current = 1000W ÷ 24V = 41.7A
With safety margin: 41.7A × 1.25 = 52A
Requirement: controller rated at ≥ 53A → 1000W Wind Turbine MPPT Charge Controller
These 3 examples reveal a pattern worth internalizing: the higher the system voltage, the lower the current required for identical power output. This is precisely why larger off-grid wind power systems default to 24V or 48V configurations — not just for controller economy, but because lower current means thinner (and cheaper) cable runs, lower resistive line losses, and easier installation overall.
System Voltage Selection: The Variable That Shapes Everything Else
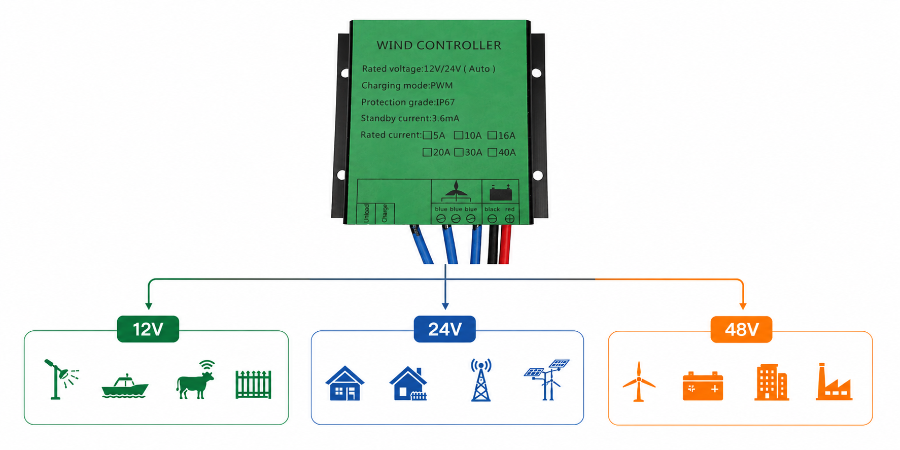
Before applying the sizing formula, one prerequisite must be confirmed: the wind turbine controller's voltage rating must match the nominal voltage of your battery bank. A voltage mismatch will either prevent the system from operating or cause immediate hardware damage. Small-to-medium off-grid wind systems operate at 3 standard voltages:
- 12V systems suit low-power, short-run applications — standalone solar street lights, marine auxiliary power on small boats, remote livestock monitoring, and gate automation. At 12V, the same watt output produces the highest current of the three options, which means thicker cables and more careful attention to connection quality. Recommended for cable runs under 10 meters and load power under 300W.
- 24V systems represent the most common configuration in small off-grid wind installations globally. For identical power output, current is halved compared to 12V, significantly reducing line losses and allowing thinner wiring over longer distances (10–30 meters). This is the standard choice for off-grid cabins, rural homesteads, remote telecom base stations, wind-solar hybrid street lighting, and agricultural monitoring systems across North America, Europe, Southeast Asia, and Sub-Saharan Africa. Inverter.com 300W–1000W controller range supports 12V/24V automatic recognition — the controller detects battery bank voltage at startup and self-configures, eliminating manual switching errors.
- 48V systems apply to high-capacity installations pairing 800W+ turbines with large battery banks, commercial off-grid deployments, and industrial edge power systems. The further reduction in current makes long-distance transmission more efficient. Selected 800W and 1000W controller models are available in 48V configurations on request.
Inverter.com Product Line: Direct Sizing Reference
Applying the formula to the Inverter.com wind turbine MPPT charge controller lineup:
| Model | Rated Power | Rated Current | System Voltage | IP Rating | Recommended Application |
| 300W MPPT | 300W | ~30A | 12V/24V Auto | — | Small home, marine, street light |
| 400W MPPT | 400W | 40A | 12V/24V Auto | IP67 | RV, yacht, gate automation |
| 500W MPPT | 500W | ~50A | 12V/24V Auto | — | Off-grid homestead, farm |
| 600W MPPT | 600W | ~60A | 12V/24V Auto | — | Farm, remote surveillance |
| 800W MPPT | 800W | ~80A | 12V/24V Auto | IP67 | Outdoor street light, commercial off-grid |
| 1000W MPPT | 1000W | ~100A | 12V/24V Auto | IP67 | Large off-grid system, commercial site |
All models use full MPPT charging technology combined with PWM-based noiseless dump load discharge. Operating temperature range: -20°C to +60°C (-4°F to 140°F). The 400W, 800W, and 1000W models carry IP67 waterproof and dustproof ratings, making them suitable for fully exposed outdoor mounting in coastal, tropical, desert, and high-humidity environments.
3 Sizing Mistakes That Cost People Time and Money
Understanding the formula is the starting point. These three errors appear repeatedly in real-world installations and are worth knowing before you finalize your selection.
- Mistake 1 — Using the turbine's rated power directly as the controller rating, with no safety margin. This is the single most common sizing error. Wind turbines nominally output their rated power at rated wind speed, but real sites experience wind gusts that push output well above that figure. A controller sized with zero overhead will trip overcurrent protection during the first strong wind event — and repeated tripping accelerates internal wear. The 1.25× factor is not conservative padding; it is the minimum accepted industry standard for wind turbine charge controller sizing.
- Mistake 2 — Assuming that a significantly oversized controller provides extra protection. A 1000W controller on a 300W turbine seems safe, but the controller's internal current sampling circuit is calibrated for its full rated range. When the actual operating current runs at 20–30% of rated capacity for extended periods, sampling accuracy degrades. The MPPT algorithm's power tracking becomes less precise, and the charging profile drifts. The result is a battery bank that chronically runs slightly undercharged, quietly accelerating capacity fade over months of use. Size to the formula — it is the correct approach for battery longevity.
- Mistake 3 — Mismatching system voltage. Users occasionally purchase a 12V-rated controller and connect it to a 24V battery bank (two 12V batteries wired in series). The controller either throws an immediate error, refuses to operate, or, in worst cases, suffers overvoltage damage. Voltage compatibility is the prerequisite that must be confirmed before power rating. The 12V/24V automatic recognition feature on Inverter.com's controllers provides meaningful protection against this error for dual-voltage configurations, but 48V requirements must always be explicitly specified at purchase.
Wind-Solar Hybrid Systems: Additional Sizing Considerations
If your installation combines a wind turbine with solar panels — a wind-solar hybrid off-grid system — sizing requires two additional considerations.
First, do not simply add the wind turbine rated power and the solar panel rated power and select a controller for the combined total. Wind and solar generation peaks rarely overlap precisely. However, under certain conditions (sunny days with steady wind), both can reach high output simultaneously. The standard approach is to manage each source independently: a dedicated wind turbine charge controller for the turbine, and a separate solar MPPT charge controller for the panels, both charging the same battery bank.
Second, if you are using a purpose-built wind-solar hybrid charge controller, verify that the product specifications list rated power separately for the wind input and the solar input — and that the sum of both maximum input currents falls within the controller's rated capacity. Hybrid controllers that do not clearly specify this separation should be treated with caution.
Summary
Sizing a wind turbine charge controller comes down to one formula: (turbine rated power ÷ system voltage) × 1.25 = minimum rated current. Confirm that figure against the product spec sheet, verify voltage compatibility, and check that the IP rating matches your installation environment. Those three steps cover the vast majority of sizing decisions for small-to-medium off-grid wind power systems.
If you want to verify specifications for a specific model or need guidance on a configuration not covered above — including 48V systems, wind-solar hybrid setups, or turbines above 1000W — visit the wind turbine MPPT charge controller catalog at Inverter.com or contact the technical support team directly for model-specific recommendations.